


How to Fill Out a Chain of Custody Form for Inspectors & Consultants
- Posted on: April 29, 2026
If you collect mold or asbestos samples, the Chain of Custody form is more than paperwork. It is the document that tells the lab what you collected, where it came from, what testing you need, and how quickly you need results. When it is filled out clearly, it helps prevent delays, reduces follow-up questions, and makes the final report easier to match back to your field notes. Below we’ll review how to fill out a chain of custody form for inspectors.
For inspectors and consultants, a complete form helps protect sample identity, keep the project organized, and reduce avoidable delays.
Why the Chain of Custody Form Matters
A Chain of Custody form creates a clear handoff between the field and the lab. It gives the lab the details needed to process the right samples, apply the right test codes, and issue the report to the right people.
It also helps with:
- reducing avoidable mistakes
- speeding up sample log-in
- improving report accuracy
- documenting who submitted the samples
- avoiding delays when turnaround time matters
When deadlines are tight, clean paperwork matters almost as much as clean sampling. Let’s walk through the form section by section and learn how to fill out a chain of custody for inspectors.
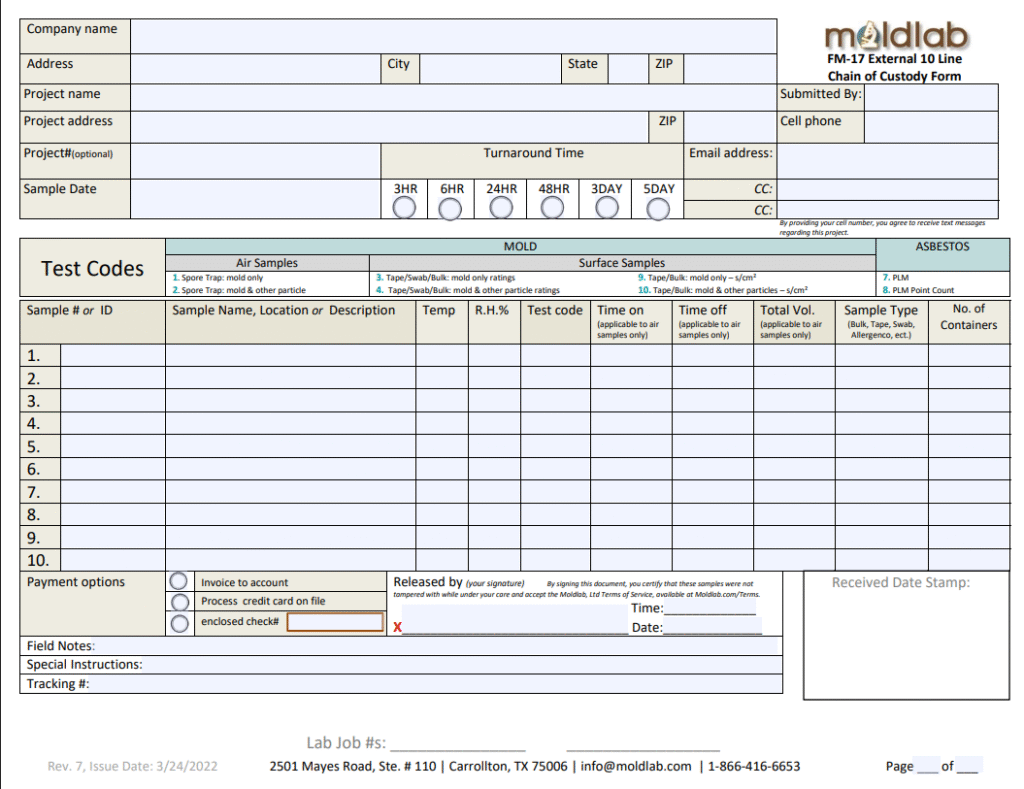
Section 1: Company Information
This section usually includes the company name and company address.
What goes here
- Company name
- Address
- City, state, ZIP
Why it matters
This identifies who is submitting the samples. It helps the lab connect the package, the project, and the reporting account correctly. If there is a question during log-in, this section helps our sample receiving team confirm where the samples came from and which business submitted them.
It also supports cleaner recordkeeping, especially for firms managing multiple inspectors, branches, or project locations.
Helpful tip: Use the exact same company name and format you use on reports, invoices, and shipping materials. Consistency reduces confusion.
Section 2: Project Information
This section includes the project name, project address, and optional project number.
What goes here
- Project name
- Project address
- ZIP
- Optional internal project or file number
Why it matters
This connects the sample set to the correct property or job. That becomes especially important when inspectors are handling several active projects at once. A clear project identifier helps the lab label the project correctly and helps the inspector/consultant match the results back to the inspection file later.
If the address or project name is vague, it increases the chance of extra follow-up or confusion when the report is issued.
Helpful tip: Use the exact project name or address that appears in your inspection records so the report matches your internal file.
Section 3: Submitter Contact Information
This part usually includes the name of the person submitting the samples, cell phone number, and email address.
What goes here
- Submitted by
- Cell phone
- Email address
Why it matters
If the lab needs to clarify a sample entry, verify turnaround, or confirm instructions, they need to know exactly who to contact. A clear contact section reduces delays and helps the right person receive updates or results.
It also helps make sure the final report goes to the correct inbox, which matters when a job is time-sensitive or when several people are involved in one project.
Helpful tip: Use the phone and email that will actually be monitored during the turnaround time window.
Section 4: Sample Date
What goes here
- The date the samples were collected
Why it matters
The sample date helps document when the field work took place. That can matter for project tracking, client documentation, and internal quality control. It also gives useful context if questions come up later about sample timing, shipping, or turnaround expectations. And at Moldlab, Ltd. it’s a required piece of information that we need to generate our daily DFW Outdoor Flashback Report.
Helpful tip: Use the actual collection date, not the date the form is completed.
Section 5: Turnaround Time
What goes here
- One selected turnaround option
Why it matters
Turnaround time tells the lab how quickly the samples need to be processed. If that section is left blank or is unclear, the lab may need to follow up before proceeding. That can create avoidable delays.
This section is especially important for projects with real estate deadlines, remediation decisions, clearance work, or Friday sample drops where timing directly affects the client experience. Moldlab offers seven-day service and no weekend upcharges for inspectors who need a dependable workflow.
Helpful tip: Mark the turnaround clearly and confirm it matches the client’s expectations before shipment.
Section 6: Test Codes
The form includes a test code reference area for mold and asbestos sample types.
What goes here
- Spore Trap: mold only
- Spore Trap: mold and other particle
- Tape, swab, or bulk: mold only ratings
- Tape, swab, or bulk: mold and other particle ratings
- Tape or bulk quantitative
- PLM
- PLM point count
Why it matters
The test code tells the lab what type of analysis is being requested. This is one of the most important technical parts of the form because it affects how the sample is processed and how the results are reported.
If the wrong code is selected, the lab may need clarification or the sample may not be processed the way the inspector intended. Clear test code selection helps avoid errors, delays, and mismatched reporting.
Helpful tip: Double-check that the test code matches the sample type you actually collected, and when in doubt call the lab 972-820-9373.
Section 7: Sample Entry Table
This is the main body of the form and where each sample is documented. Before selecting the sample type and test code, review our guide on how to choose the right surface sampling method for tape lifts, swabs, and bulk samples.
What goes here
For each sample, fill in:
- Sample number or ID
- Sample name, location, or description
- Temperature-optional
- Relative humidity-optional
- Test code
- Time on-only applicable to air samples
- Time off-only applicable to air samples
- Total volume
- Sample type
- Number of containers-optional
Why it matters
This section tells the lab exactly what each sample is and how it should be interpreted. It links the physical sample to the project context and the requested testing.
A complete sample table helps the lab identify each sample correctly, match field labels to the paperwork, process the right method, report results against the right location, and reduce check-in questions.
Why each column matters
Sample # or ID: This gives each sample a unique identifier. It matters because the sample label and the form should match exactly.
Sample Name, Location, or Description: This explains where the sample came from. It matters because clear location names make the report easier to understand and use.
Temp and R.H.%: These provide environmental context at the time of sampling. That can help support interpretation and create a more complete field record. This is optional data, but recommended.
Test code: This tells the lab what analysis to run. It matters because it directly affects processing.
Time on / Time off / Total Volume: These are necessary for air samples. They document how long the sample ran and the volume collected, which affects how the sample is analyzed and reported.
Sample Type: This clarifies whether the sample is bulk, tape, swab, or another type. It matters because the lab should not have to guess.
Number of Containers: This helps verify what was physically submitted. It matters for sample check-in and inventory control.
Helpful tip: Write descriptions specific enough that someone else could identify the sample location without asking follow-up questions.
Section 8: Payment Options
What goes here
- Payment method selection
- Check number if applicable
Why it matters
This helps the lab understand how the job should be billed. If the payment section is incomplete, it can slow down processing or create administrative follow-up after the samples arrive.
Helpful tip: If you have a standard payment setup, use the same option consistently unless a project requires something different.
Section 9: Release and Signature
What goes here
- Signature
- Time
- Date
Why it matters
This section documents the formal handoff of the samples. It confirms that the submitter is releasing the samples for analysis and supports the chain-of-custody record.
Helpful tip: Do not leave this section unfinished- the lab cannot process the samples unless the form is signed.
Section 10: Field Notes, Special Instructions, and Tracking Number
What goes here
- Field notes
- Special instructions
- Tracking number
Why it matters
Not every project needs extra notes, but when they do matter, they matter a lot. This section is helpful for unusual jobs, rush handling, multi-unit projects, special communication requests, or anything else the lab should know during check-in or processing.
The tracking number is also useful because it helps tie the paperwork to the shipment if there is any delivery question.
Helpful tip: Keep notes short, practical, and directly related to processing or identification.
Common Mistakes to Avoid
- sample labels not matching the form
- missing turnaround selection
- vague location descriptions – or duplicate descriptions
- missing contact information
- incorrect or unclear test codes
- incomplete air sample timing details
- unsigned release section
Each of these can slow down check-in or create unnecessary clarification emails and calls.
Quick Review Checklist Before Shipping
- the project information is complete
- the submitter contact details are correct
- every sample label matches the form
- the right test code is selected
- the turnaround time is clearly marked
- air sample timing and volume are complete if applicable
- payment details are filled out
- the release section is signed
- any needed instructions or tracking number are included
Final Thoughts
A Chain of Custody form should do more than accompany the samples. It should make the submission process easier, clearer, and more accurate. When each section is filled out carefully, it helps the lab process the samples efficiently and helps the inspector get results back with fewer delays.
For an inspector or consultant, that means less back-and-forth, cleaner documentation, and a smoother path from fieldwork to final report.
Need a simpler sample submission process?
A Chain of Custody form should do more than accompany the samples. It should make the submission process easier, clearer, and more accurate. When each section is filled out carefully, it helps the lab process the samples efficiently and helps the inspector get results back with fewer delays.
For inspectors and consultants, that means less back-and-forth, cleaner documentation, and a smoother path from fieldwork to final report.
Ready to Send Samples?
If you are preparing a submission now, use our How to Send Us Samples page for forms, shipping steps, and sample submission instructions.
If you are new to Moldlab and want a broader overview of onboarding, turnaround, and inspector support, start with the New Inspector Mold page.